 |
| Lighting Bolt & Golden Star |
For my twin nephews' 5th birthday, I made them each a superhero cape — complete with superhero cuffs and masks. Even though I was really nervous, the fabric of choice was satin because my husband and I believed the shininess would give them extra super powers!
I wasn't too happy with the cape pattern I found online; the width was about the size of a bath towel. I wanted a cape that's big enough so that they can grab it, bring it over their shoulders, and cover their faces. So I made my own pattern, but it's really just a half circle.
Below are the instructions for the cape, mask, and cuffs:
**NOTE: The capes I made for the twins have two colours. Blue on one side and red on the other. And vice versa.
MAKING THE CAPE
MATERIALS:
- 2 meters of Satin (1 meter for the front and 1 meter for the back of the cape)
- Satin - in colours for the circle, star/lighting bolt, and initial
- Iron-on adhesive for the initials, symbols, and circle
- Iron-on interfacing for the collar
- Velcro
- Scrap paper to help with satin stitching
STEP 1— CREATE YOUR PATTERN
- Download the pattern.
- Draw your pattern on Kraft paper and cut it out. For the collar tabs, don't forget to add an extra 1/2 inch for seam allowance.
 |
| Draw your pattern on Kraft paper, and cut it out. |
Here are the symbols I used:
 |
| Print 1 for circle, 1 for star/lighting bolt, and 1 for the initial. |
- From your computer, print out the initial. Avoid cursive and serifs fonts for easy sewing.
STEP 2 — CUT OUT THE PIECES
- Cut 2 half circles for the cape. One for the front, and one for the back.
- Transfer the collar pattern (two are mirror images of each other) on to the interfacing, iron on the interfacing to the wrong side of the fabric and cut it out. You should have 4 collar pieces in total (2 pieces are mirror images of the other). Set aside.
STEP 3 — SEW ON THE GRAPHICS
- Draw the circle onto the paper side of the iron-on adhesive.
- Iron the adhesive to the wrong side of the frabric .
 |
| Adhesive is iron on the wrong side of the fabric before cutting out the circle. |
- Cut out the circle.
- Peel off the paper backing and iron it onto the cape.
- Set your sewing machine to create a dense zigzag stitch (close together). Also referred to as a satin stitch.
- To prevent buckling, slide a piece of paper underneath the circle. Satin stitch around the circle.
 |
| Back of the cape. |
 |
| Front of the cape. |
- Repeat for the Star/Lighting bolt.
- Repeat for the initial.
- Remove the paper on the back.
STEP 4 — MAKE THE COLLAR
- Pin the pieces right sides together.
- Sew with a 1/2 inch all around, leaving the ends open.
- Trim seam allowance to 1/4 inch (except for the opening), and clip around the curve edge.
- Turn right side out, and iron.
- Top stitch 1/4 inch all around, leaving the ends open.
- Repeat for the other set.
STEP 5 — PUTTING THE CAPE TOGETHER
- Pin the two half circles right sides together.
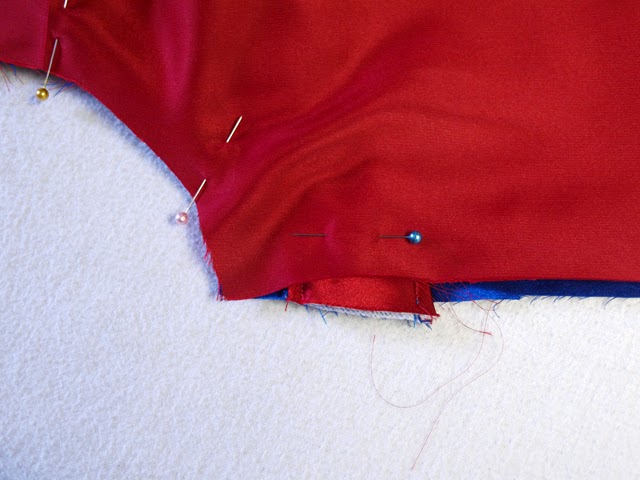
- Insert the collar, 1/2 inch from the "neck" edge.
 |
| Collar is pin 1/2 inch from the neck's edge. |
- Sew with 1/2 inch all around leaving a 5 inch opening on the bottom.
- Clip around curve edge.
- Turn right side out.
- Iron and top stitch 1/4 inch all around.
- Sew Velcro onto the collars.
 |
| Cape with top stitching along the edge. |
 |
| The finished superhero cape. |
MAKING THE MASK
MATERIALS:
- Satin (left over from the cape)
- 1/2 inch elastic (length according to your little one's head)
- A safety pin
- Iron-on interfacing
STEP 1 — COVERING THE ELASTIC (OPTIONAL)
- Cut 1½ inch by the longest length the elastic will stretch.
- Fold right side together and sew 1/2 inch along the edge.
- Turn right side out and thread elastic through with the safety pin
- Sew the ends to hold elastic in place.
 |
| Ends are sewn to hold elastic in place. |
STEP 2 — PUTTING IT TOGETHER
- Begin with the pattern found here.
- Transfer the pattern onto the interfacing
- Add 1/2 inch seam allowance
- Iron interfacing to the wrong side of fabric, and cut out the mask.
- Repeat for the other side.
 |
| 1/2 inch seam allowance added, interfacing iron on fabric, and cut out. |
- Insert strap and pin right sides together.
 |
| Strap is sandwiched between the two masks, pinned, right sides together |
- Sew 1/2 inch all around, leaving a 2 inch opening
- Trim seam allowance to 1/4 inch (except for opening), and clip curve edges.
- Turn right side out and iron
- Hand sew the opening close
- With white pencil crayon, draw the opening for the eyes
 |
| Use a light pencil crayon to draw the opening for the eye |
- Satin stitch around the opening of the eye.
- Cut out the eye piece.
 |
| The finished superhero mask. |
MAKING THE CUFFS
MATERIALS:
- Satin (left over from the cape)
- Iron-on interfacing
- Iron-on adhesive
- Velcro
STEP 1 — MAKING THE PATTERN
- Measure the your little one's wrist to determine the size of the rectangle. Remember to overlap, and to add 1/2 inch seam allowance.
- Shrink the star/lighting bolt to your desire size.
STEP 2 — CUTTING OUT THE PIECES
- Draw 4 rectangles on the interfacing
- Iron the interfacing to the wrong side of the fabric
- Cut out the rectangles
- Draw two star/lighting bolt on the paper side of the adhesive
- Iron the adhesive to the wrong side of the fabric
- Cut out the shapes
STEP 3 —PUTTING IT TOGETHER
- Peel off the paper backing and iron the shape onto the cuff.
- To prevent buckling, slide a piece of paper underneath the shape. Slowly, begin satin stitching around the shape.
- Remove the paper.
- Pin two rectangles, right sides together.
- Sew 1/2 inch all around leaving a 2 inch opening.
- Clip off corners and turn right side out.
- Iron and top stitch 1/4 inch all around
- Sew on Velcro
- Repeat for the other cuff
 |
| The finished superhero cuffs. |
|
|
 |
| Superhero cape, mask, and cuff. |
If you don't have time, and would like me to make it for you, you can purchase it
here, on my Etsy Shop.


Awesome! Thank you!!
ReplyDeleteYou're welcome :)
ReplyDeleteMy two grandsons, age 3 and 2 , are going to love these :) Thanks so much for posting !
ReplyDeletewould you mind if I featured this tutorial on my new sewing community blog that I am in the midst of setting up? It would just be an image, a short description and a link through to your original blog post.
ReplyDeletethanks
Hannah Smith
Sure! I would love to visit your blog when it's up!
Deletedid you have any problems using iron ons with a satin/polyester?
ReplyDeleteAt first I did have problems. But sliding a piece of paper underneath the graphics as I am satin stitching really helped to stabilize the fabric. The paper is removed once everything is complete. Try it out on a scrap piece of fabric until you get the hang for it.
ReplyDeleteHow do I get the circle, lightning bolt, and star to print to size?
ReplyDeleteIf you click on the image, and then right-click, then save it to your desktop, you can print it from there. That's how I did it.
DeleteWhat font did you use? I'm having trouble deciding and really like yours.
ReplyDeleteI am so sorry for my late reply. My notification settings must have been turned off. The font I used was Impact. The point size is 550 pt.
DeleteThank you! I can't wait to see my boys' faces when they unwrap their capes in the morning. Merry Christmas!
ReplyDeleteWhere do I find the link for the cape pattern?
ReplyDeleteThis comment has been removed by the author.
DeleteIn step 1, there is an image of the measurements I have used for my cape. You need get a large sheet of paper, and draw your pattern using my measurements.
Delete* to get
DeleteFantastic pattern! I have made several for family and friends and it's the best I have found. What is your policy on selling finished capes?
ReplyDeleteThank you so much!
DeleteI also sell the capes, but if you can change the pattern a little (like adding a collar for example) to make it your own I am fine.
Thanks again,
Joanne
Fantastic pattern! I have made several for family and friends and it's the best I have found. What is your policy on selling finished capes?
ReplyDeleteI'm having trouble figuring out how to get 2 half circles with the amount of fabric you said to use.
ReplyDeleteThe fabric I got was about 60 inches in width (30 inches folded in half). To make one cape, I purchased 1 meter in red, and 1 meter in blue.
DeleteAre there directions for no sewing? I have to make for 30 kids a mask, cape, belt, cuffs and shoe wings in a week. Yesterday I had 3 other people and today nobody. Any way to do easier?
ReplyDeleteYou can try searching online for no sew cape. As for accessories, maybe you can try using felt? The edge of felt doesn't fray, so you wouldn't need to sew the edges.
DeleteHi. My question is about the iron on adhesive. All I could find is the stitch witchery stuff. Which isn't right. What exactly did you use?
ReplyDeleteFor underneath the circle. Brand/store?
DeleteThanks!
Hello,
DeleteThe iron-on adhesive brand is Heat n Bond Feather Lite.
Hope that helps,
Joanne
Can you explain what you mean by adding 1/2" onto the collar pattern? Is that to the length? 1/2" all around? I'm not a very experienced sewer and am trying to figure this out. TIA!
ReplyDeleteHello,
DeleteThe collar you've drawn is the FINISH size. So you need to add 1/2 inch for the seam allowance.
Once you've drawn your collar, draw a 1/2 inch border all around the collar before cutting it out.
Hope this helps,
Joanne
Hi I am trying to make my son a cape and totally new to this. Id like to do the satin stitch around a circle I have already ironed onto the cape. Can i do this or is it too late? Should i have done it before? Clueless as to how i do the satin stitch that borders the circle. Could you give me an idiots guide step by step? I did look at your instructions but was confused as ive already put the circle onto the cape! Thanks in advance!
ReplyDeleteKate
Hello,
DeleteSo you've ironed the circle onto the cape, and now it's "glued" to the cape correct? Perfect.
Set your machine to a tight zig-zag stitch, slide a piece of paper underneath the cape (to help stabilize the fabric), and stitch around the circle.
Try this stitching on a piece of scrap fabric to get the hang of it before working on the cape.
Thanks,
Joanne
Searching for hours and came across your tutorial. It's the best and now I will be able to make my 5yr old grandson an entire superhero costume with confidence.
ReplyDelete